Links tab
In the AME, the Links tab
provides the user interface for storing the names of candidate macro
screens into the <nextscreens> element of a macro screen. Figure 1 shows a sample Links tab:
Figure 1. Links tab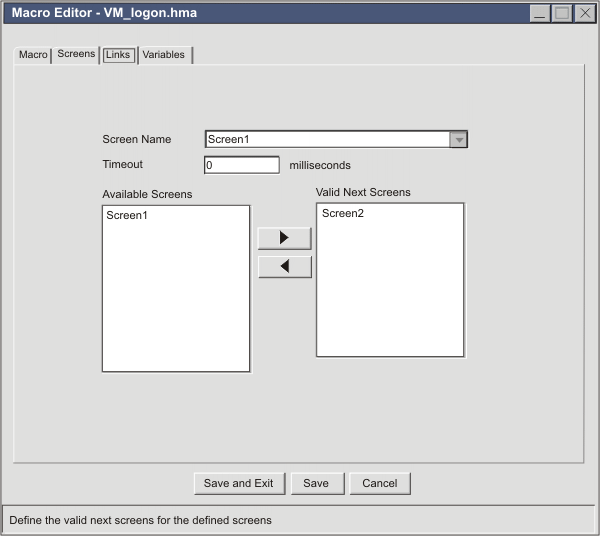
In Figure 1, the Screen Name list box at the top of the
tab contains a list of all the macro screens in the entire macro.
The currently selected macro screen is Screen1. On the right, the Valid Next Screens list box contains a
list of candidate macro screens for Screen1. (Do not confuse this
list box, which contains the names in the <nextscreens> element
of Screen1, with the list of valid next screens that the macro runtime
uses when a macro is played back). On the left, the Available Screens list box contains a list
of the names of all other macro screens.Figure 1 shows only
one screen in the Available Screens list
because this figure is from a macro with only two macro screens in
it, Screen1 and Screen2. However, imagine a macro
of twenty screens, and suppose that you want to add macro screens
to the <nextscreens> list of a new macro screen, ScreenR. You would
follow these steps:
- On the Links tab, expand the Screen Name list box and scroll down until you find ScreenR.
- Select ScreenR.
- Because ScreenR is a new screen, there are no macro screen names listed in the Valid Next Screens list on the right.
- On the left, the Available Next Screens list box contains the names of all the macro screens in the macro.
- Select a screen that you want to add to the list for ScreenR. Suppose that you select ScreenS.
- After selecting ScreenS, click the right arrowhead button between the two list boxes. ScreenS is added to the list box on the right, and removed from the list box on the left.
- In the same way, move the names of any other macro screens that you want to the Valid Next Screens list box for ScreenR.
- Move a total of three screen names: ScreenS, ScreenG, and ScreenY.
In the source view, you would see the names of the valid next macro
screens, ScreenS, ScreenG, ScreenY, stored inside ScreenR as shown
in Figure 2:
Figure 2. Macro screen ScreenR with <nextscreens>
element
Figure 2 shows the <screen> element
for ScreenR, with the name attribute set to "ScreenR".
Inside are the three primary structural elements of a <screen>
element: the <description> element, the <actions> element, and
the <nextscreens> element. The contents of the <description>
element and the <actions> element are not shown but are indicated
with ellipses (...). The <nextscreens> element contains three <nextscreens>
elements, and each <nextscreen> element contains the name of one
of the valid next screens: ScreenS, ScreenG,
and ScreenY.<screen name="ScreenR" entryscreen="true" exitscreen="false" transient="false">
<description>
...
</description>
<actions>
...
</actions>
<nextscreens>
<nextscreen name="ScreenS"/>
<nextscreen name="ScreenG"/>
<nextscreen name="ScreenY"/>
</nextscreens>
</screen>For more information about runtime processing see How the macro runtime processes a macro screen.