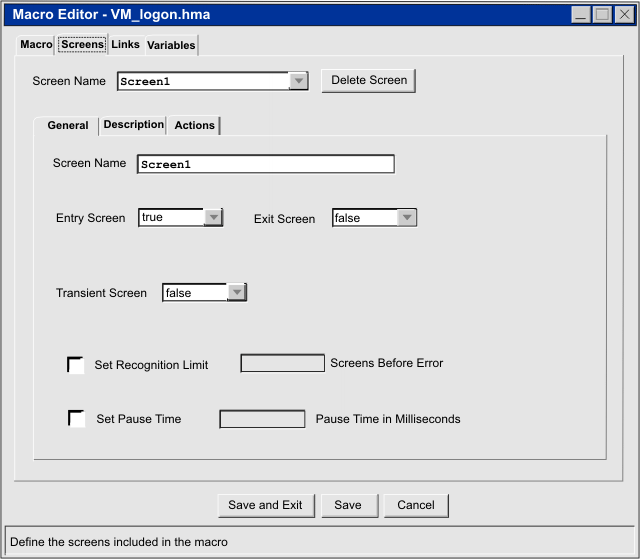
Screens tab

- A Screen Name list box at the top of the tab
- Three subordinate tabs, labeled General, Description, and Actions
- The Screen Name field at the top of the Screens tab is a list box that contains the names of all the macro screens in the macro.
- The Screen Name field at the top of the General subtab is an input field in which you can type the name that you want to assign to the currently selected screen.
In the Screen Name list box at the top of the Screens tab, you click the name of the macro screen that you want to work on (such as Screen1), and the AME displays in the subtabs the information belonging to that macro screen. For example, in Figure 1 the list box displays the macro screen name Screen1 and the subtabs display the information belonging to Screen1. If the user selected another macro screen name in the list box, perhaps Screen10, then the AME would display in the subtabs the information belonging to macro screen Screen10.
In the Screen Name input field under the General tab, you type the name that you want to assign to the currently selected macro screen. A screen name such as Screenx, where x stands for some integer (for example, Screen1), is a default name that the Macro object gives to the macro screen when it creates the macro screen. You can retain this name, or you can replace it with a more descriptive name that is easier to remember. (When all your macro screens have names such as Screen3, Screen10, Screen24, and so on, it is difficult to remember which macro screen does what.)
- The General subtab presents the information stored in the attributes of a <screen> element.
- The Description subtab presents the information stored in the <description> subelement of a <screen> element.
- The Actions subtab presents the information stored in the <actions> subelement of a <screen> element.
   <screen name="Screen1" entryscreen="true" exitscreen="false" transient="false">
   ...
</screen> <screen name="Screen1" entryscreen="true" exitscreen="false" transient="false">
<description>
<oia status="NOTINHIBITED" optional="false" invertmatch="false" />
</description>
<actions>
<mouseclick row="4" col="15" />
<input value="3[enter]" row="0" col="0" movecursor="true"
xlatehostkeys="true" encrypted="false" />
</actions>
<nextscreens timeout="0" >
<nextscreen name="Screen2" />
</nextscreens>
</screen>By default the Set Recognition limit check box is cleared and the input field is disabled. If you select the check box, then the macro editor sets the default value of the Screens Before Error input field to 100. You can set the value to a larger or smaller quantity. For more information, see Recognition limit.